Showing posts with label Vegetables. Show all posts

Sunday, March 01, 2009

Asparagus -- Not Bubbly-Friendly!

I love asparagus. White or green. Thick or thin. Steamed, roasted, sauteed. Breakfast, lunch or dinner.

And I feel quite the same way about champagne. Although that's not surprising. Who hasn't heard of some bubbly with eggs benedict for breakfast, with some cheese and bread and figs for a picnic lunch, with a multi-course feast of any kind for dinner.


But asparagus and champagne together? Well, I admit that I have combined them at the same meal. But even I, a lover of both of them individually, must admit that they don't go together all that well. Lots of chemical explanations for that, as the foodie books and articles explain.

But then after all, love and chemistry -- nothing new there, either!

Saturday, May 13, 2006

Egg-zactly Like Mama!


"There was a big eggplant who lived in a stew, she had so many children, she didn't know what to do!" A thousand pardons to the old nursery rhyme, but really, storing "old" eggplants in a "shoe" just doesn't sound very appetizing, does it?

Though, if one DID store eggplants in a shoe, quite a lot of them could easily be made to fit -- IF they were of the miniature variety. It is very tempting to refer to the mini variety as "baby" eggplants, especially on Mother's Day weekend!

Some of these babies look "egg-zactly" like their Mama, in miniature. Actually though, miniature eggplants may be one of several distinct varieties and not necessarily the younger specimens of standard eggplant.

Those shown in the photo are usually referred to as Italian or Baby Eggplants. Understandably, they look exactly like their larger counterparts, with dark-and-shiny deep-purple skin -- just baby-sized.

Other small-format eggplants include Italian Rosa Biancos, which are white-violet in color; Chinese eggplants, which are pale violet, slim-sized; and Thai Apple eggplants which are round, green and the general size and shape of a small apple.

Sometimes Japanese eggplants are simply picked at a very young stage. Small, and slim, these medium purple eggplants are not miniatures in the strict sense of the word. Though that does make them "baby" eggplants by definition, I suppose!

With thinner skins and fewer seeds, miniature eggplants are generally sweeter and more tender than the larger varieties. Their edible skins add a good fiber dimension to their nutritional profile.

Reflecting today's interest in heirloom vegetables, a larger assortment of miniature eggplants is reappearing in backyard and truck gardens. Eggplants of many descriptions are available year round, though the peak growing season in the U.S. is from July to October.

Just this weekend, I found miniatures available for the first time this season at my local farmer's markets, just in time for Mother's Day. Florida, New Jersey, California and Mexico are home to the major North American sources.

Eggplants are great flavor sponges. They love to combine with more-intense flavors such as tomatoes, onions, garlic and/or cinnamon. Herbs, with their intrinsic depths of flavor, are another particularly-good pairing with eggplant.

The miniature eggplant varieties are so easy to use because they are thin-skinned and don't need to be peeled. A quick wash and slice, and they are ready to march straight into a waiting cook pan like obedient little soldiers who are all dressed up in their best, colorful uniforms.

My tried-and-true quick-roast method always works beautifully and is my "go-to" preparation method. I just trim off the tops of the little eggplants, halve them lengthwise, put them onto a baking sheet, drizzle them with some good extra-virgin olive oil, and then top with some salt, pepper, garlic powder, cinnamon and woodsy herbs (I think that rosemary and thyme blend especially well).

In the oven (or toaster oven -- mini veggies being VERY comptible with mini ovens!) at 400 to 425 degrees for 15 to 25 minutes, these little mini-halves roast up caramelized, lightly-brown and delicious. The "to the tooth" component of soft eggplant flesh contrasted with slightly-chewy skin, popped into the mouth for satisfying little flavor explosions, is the extra pleasure of the mini eggplant format.

Of course, mini eggplants are great additions to pasta sauces, soups, casseroles and quicker-cooking stews, just as larger-format eggplants are. Their subtle flavor simply seems to meld compatibly with so many other ingredients. To maintain the pretty color and pleasing texture of the skin, they simply should be added near the end of the cooking process.

The quesions of why eggplants are called "eggplants" is similar to the old chicken-and-egg question. Hmmm -- are all "eggy" things questionable and unanswerable? Some state emphatically that eggplants are so named because the most-common, Italian version is shaped like an egg. Others contend, just as strongly, that eggplants received their name because a traditional preparation method involves dipping slices into beaten eggs and then frying.

The Ingredient Sleuth is wise enough to sidestep that debate. Or perhaps to combine it! My reaction to it is simply to slice up miniature egg-shaped eggplants into omelets and frittatas and even scrambled eggs! If one "egg" product is good, the combination of two HAS to be even better!

I'm sure that the baby eggplants' mothers, like all Mamas, would be ever so proud of them for playing so well with other ingredients! If all those little baby eggplants DID live with their mother in the stew, I'm sure that THEY would know WHAT to do!

Bon appetit -- and Happy Mother's Day!


Saturday, April 15, 2006

A Hard-Boiled (Egg) Story


In my neighborhood, eggs seem to grow on trees! Giant, colorful eggs sprout once a year, in springtime, at just one house on the block. I’ve always wondered what the homeowners DO with all those eggs? And just how tall IS that Easter Bunny, to be able to attach the eggs to such a big tree? And, which DID come first, the tree – or the eggs?

Without delving deeper into this little piece of fiction, or into the infamous and unanswerable chicken-or-egg-first question, let’s just enjoy eggs for what they are and focus for a moment on this week’s favorite: the hard-boiled Easter egg. Whether delivered by the Easter bunny in baskets or buckets or on trees, these tasty hard-cooked, versatile eggs can be eaten from breakfast to dinner and all times in between.

Many different variations of cooking method have been promoted, from time to time. The most-common method simply involves placing eggs into a saucepan wide enough to allow them to sit in one layer without crowding, deep enough to allow one inch of water to cover the top of the eggs and a couple of inches more space to allow for boiling froth.

Over high heat, bring the eggs and water just to a full boil. Then, remove the pan from the heat immediately and cover with a tight-fitting lid. Let the eggs stand in the pan, covered for 15 minutes. Then, pour off the hot water and run cold water over the eggs to stop them from cooking and to make peeling easier.

Shelling hard-cooked eggs is also made easier by using eggs that are at least several days old, gently tapping the entire surface of the shell against a flat surface and peeling from the large end. Some people like to peel eggs under running water to further assist in the shell-removal process.

The following delicious recipe using hard-boiled eggs comes from the LIDIA’S FAMILY TABLE cookbook (Alfred A. Knopf Publishers, New York, 2004), by Lidia Matticchio Bastianich with David Nussbaum. Techniques and recipes from this book are also featured in Ms. Bastianich’s syndicated PBS-TV series.

Both the TV show and the cookbook allow aspiring Italian cooks to spend some virtual time in Lidia’s kitchen and learn the techniques that she uses – the ideas and methods that were passed to her through her family and that she has developed for use in her highly-popular restaurants in New York City, Pittsburgh and Kansas City.

Starting from the basics, Ms. Bastianich describes beloved Italian everyday favorites and then progresses to tried-and-true variations, improvisations and cook-to-cook tips – just as she would if standing next to a cooking enthusiast in her own kitchen. As she so often says on her TV show, she doesn’t want people to be a slave to the recipes but just to get ideas to use in their own cooking. A devoted author and nationwide lecturer, she also provides lots of information and ideas at her website: http://www.lidiasitaly.com/.

So, let’s gather up those hard-cooked Easter eggs and get started!

CAULIFLOWER AND EGG SALAD
(Serves 6 or more)

1 large head cauliflower (1-1/2 to 2 pounds)
½ teaspoon or more salt
3 hard-boiled eggs
3 tablespoons or more white wine vinegar
¼ cup or more extra-virgin olive oil
Freshly ground pepper to taste

Tear off all the outer leaves attached to the base of the cauliflower; reserve any tender green leaves. Cut out the bottom core, and snap or slice off all the big florets from the inner stem. Cut the florets into 1-inch chunks or thick slices (don’t break them up into tiny florets).

Bring 3 or 4 quarts of water in a large pot to the boil, drop in the florets and reserved leaves, and cook, uncovered, at a steady boil for 5 minutes, or until cooked through but not soft. Lift out the cauliflower, spread the pieces out in a colander, and sprinkle with ¼ teaspoon of the salt. Cool to room temperature.

Before serving, slice the eggs in wedges, and cut the wedges into 2 or 3 pieces each. In the bottom of a large mixing bowl, whisk together the vinegar, oil, another ¼ teaspoon salt, and grinds of pepper. Put all the cauliflower in the bowl, and tumble to dress all the pieces. Scatter the egg pieces over the top, and fold them in. Taste, and adjust the seasonings.

Arrange the salad on a serving platter, or portion on salad plates.

*Copyright Note*: Lidia Bastianich specifically authorized this recipe reprint, by the Ingredient Sleuth, in this posting.

The additional notes to the recipe indicate that this dish is good as a first course, a side dish or a partner with broccoli for a supper dish. As Lidia says, “At my grandma’s house, we used to have this kind of salad many a time, with a slice of homemade bread and some good cheese, for supper.”

The LIDIA'S FAMILY TABLE cookbook is filled with photos -- of beautiful food and of four generations of Lidia’s family-- showing the ways in which food serves as an integral part of the family's routine, creating an ongoing interaction among all generations. For the Ingredient Sleuth, those photos and the explanations never fail to bring a smile. Somehow, Ms. Bastianich has managed to capture, in book format, those person-to-person encounters that magnify all good cooking and good food.

As the Easter baskets are gathered and the pyramid of colorful eggs is placed lovingly in that bowl in the refrigerator, I hope that today’s recipe comes in handy. Enhanced by the addition of just a few additional ingredients, those eggs of the hard-boiled variety will be ready to be gobbled up by eager salad eaters in no time!

Happy Easter, buon appetito -- and as Lidia says at the close of every TV show, "tutti a tavola a mangiare!" (All to the table to eat!)

Friday, January 06, 2006

Can't Put Fennel in a Funnel ...


Fennel bulb, fronds trimmed Posted by Picasa


Q: "Fennel. Is that what they make fennel cakes out of?"
A: "Those aren't fennel cakes. They're called funnel cakes!"

Q: "Fennel. Are those the decorative tips at the ends of curtain rods?"
A: "Those aren't fennels. They're called finials!"

Q: "Well then, what the dickens IS fennel?"
A: "Thought you'd never ASK!"

Fennel is a member of the parsley family. It is sometimes referred to as sweet fennel, Florence fennel or finocchio. Its flavor is mildly reminiscent of licorice or anise -- but smoother, I think. It is used widely in the cooking of Provence and Italy and is available in great abundance throughout the fall and winter. Most major supermarkets are now part of the "fennel scene."

Fennel bulbs should be firm, the stalks straight and firm and the feathery fronds green and fresh. Often, the stalks will already have been removed at the grocery. In that case, be sure that the cut ends are fresh looking, not dry and white. Brown spots or signs of splitting are definitely to be avoided!

The stalks may be used in soups and stews -- the frondlike leaves are useful as an herb. But, it is the bulb that is the main fennel event. It is great cut into wedges, doused with the ever-popular extra-virgin olive oil, sprinkled with herbs, salt and pepper, and roasted.

Braising works well too -- slices or wedges are placed in a saucepan with just enough boiling liquid to barely cover. Broths, tomato sauce or wine work great! If you prefer firmer veggies, sautee rather than braise.

Raw, in salads, or steamed, fennel maintains all its healthful attributes to the max! It is high in vitamin C, low in calories and contains several grams of fiber per cup of raw slices.

All in all -- use it any way you like. Just can't put it through a funnel to make cakes out of it! (Having said that -- I wonder what would happen if one were to grate or grind it and make fritters with it. I may just have to try that!)

Friday, November 18, 2005

The Great Pumpkin Search

The Great Pumpkin Pie

Is this YOUR impossible dream?

Thanksgiving has arrived and the guests will gather soon. Pumpkin pies -- from scratch -- were baked this morning. But, there was NO flour on the counter and, better yet, none on the freshly-cleaned (for company, you know!) floor!

The company that makes Bisquick baking mix made this dream possible many years ago with its "impossible pie" recipes. The variations are many, from savory to sweet.

The impossible pumpkin pie was always a winner in my family (we just never liked those Thanksgiving morning floor clean-ups that a rolled-out pie crust invariably necessitates!). It still amazes me that the crust of the impossible pie finds its way to the bottom of the pan -- but it does!

And here, for your pleasure, is a little pecan variation that goes the usual pie "one better" for we gilders of lilies!

Impossible Pumpkin Pecan Pie

1 cup Bisquick baking mix
1/2 cup sugar
1 teaspoon pumpkin pie spice
2 teaspoons vanilla
2 eggs
1 can (15 oz) pumpkin puree
1 can (12 oz) evaporated milk
3/4 cup pecans, chopped

Topping:
1 1/2 cups whipped topping, thawed, or whipped cream
1/4 teaspoon nutmeg or cinnamon, optional

1. Heat oven to 350° and grease a 10-inch round (1-1/2-inch deep) pie plate.
2. Combine first seven ingredients until smooth using a hand mixer, blender or food processor.
3. Stir in pecans by hand.
4. Pour into a prepared (greased and lightly floured) pie plate.
5. Bake for 50 to 55 minutes or until a knife inserted near center comes out clean.
6. Cool on rack.
7. If desired, blend nutmeg or cinnamon into the whipped topping or whipped cream.

Serve pie with whipped cream. Store pie in refrigerator. 8 servings.

Bon appetit -- and Happy Thanksgiving!

Friday, October 21, 2005

Artful Artichokes


Wouldn’t it be nice to just be able to pick up a pencil and draw a pretty picture of whatever inspires you at the moment? Or to come rushing home from the arts-and-crafts store with a bright new selection of “colors” and set to work in a bright, north window?

Or maybe even better – to be able to get out a pen and draw feverishly in squared-off boxes to commit to a cartoon strip those pithy comments that come to mind (usually ten to fifteen minutes AFTER the perfect opportunity to say them has passed)? If I could draw (which, sadly, I can’t!), I would accompany this writing with step-by-step drawings.


Beautiful as artichokes are, they require a fair bit of instruction, not only as relates to their cooking, but also to their pre-cooking preparation and their eating as well. Like many complicated things though, they are well worth the effort!

Just like the people who eat them, artichokes come in various sizes. The small, “baby” size weighs only about 2 ounces each and are typically only an inch or so in length, tip to bottom. They grow at the base of the artichoke plant (which is a thistle like plant, though actually a member of the daisy family, whose “flower” buds are the artichokes). They are so tender and tiny that there is no fibrous (some, including the Ingredient Sleuth would say “stringy”) choke in the middle.

Moving upward, on the plant and in size, medium artichokes weigh in at 5 to 8 ounces each and come from the side branches. These are the artichokes that we will discuss, and refer to, as the “dippables”!

Large artichokes may weigh a pound or more, grow on the center stalk of the plant and are usually eaten stuffed – a bit tricky and tedious, prep-wise -- with a savory filling.

Buying tips:

- Compact and heavy for its size
- Leaves that are fleshy, thick, firm, tightly closed
- Stem end firm, no tiny holes which would indicate worm damage
- Spring artichokes soft green in color
- Fall and winter artichokes olive green, possibly bronze-tipped leaves
- Avoid blackened, wilted, bruised leaves
- Squeeze it! Plump and crisp leaves make a squeaky sound! (Beware the vegetable police during this step!)

Storage:

- Refrigerate, in a plastic bag, 4 to 5 days maximum.
- Do not wash before storing; sprinkle a few drops of water into the bag, then close.

Preparation for the “dippables”:

- Wash under cold running water
- Cut off the top inch of the artichoke with a large, sharp knife
- Optionally: clip the sharp tips of the leaves with a kitchen shears
- Optionally: prevent darkening by rubbing the cut parts with lemon juice
- Cut off the stem flush with the base to create a flat surface
- Pull of any remaining short, coarse leaves from the bottom

Cooking of the “dippables”:

- Place artichokes on their flat bases, side by side, in a large, non-reactive pot in which water is already boiling (careful for splashes!), water depth about half that of the artichokes.
- Add a couple tablespoons of lemon juice or vinegar to retain color and brighten flavor.
- Cover the pot and return the water to a boil, then reduce heat to medium-low.
- Lift the lid a few times during cooking to help with color retention (this is an EASY instruction to follow for Type A personalities, take it from me!).
- Cooking time is 20 to 40 minutes, depending upon size. They are done when an inner leaf can be pulled out easily (with tongs, not tender fingertips!).
- Invert the artichokes in a colander so that the water drains from between the leaves.

Eating (AT LAST!) of the “dippables”:

- RELAX! Really! This is an important first step. Artichokes were not meant for gobbling! They are very rich, meant to be savored and deserve to be treated as, well – a TREAT! It doesn’t matter if they “cool off” and, in fact, slightly warm to room temperature is just right to detect the full flavors.
- There it is! A lovely, whole, glistening artichoke, on its plate, in front of you – and it’s ALL for you – the whole thing!
- Pull off a leaf and dip its fleshy base into your sauce of choice.
- Place the bottom half of the leaf, curved side down, in your mouth and draw it between your teeth so that you scrape off the tender flesh from the inside of the leaf.
- Optionally: say “Mmmm” quietly -- or shout it!
- Repeat this process for all those lovely, fleshy leaves. Maybe you’ll enjoy making an artistic little arrangement of the “used” leaves on your plate!
- When you get to the inner petals – these are thin (like flower petals), rose colored, and bunched to a point at the top – you can bite off the bases rather than scrape them through your teeth.
- Underneath the petals is the choke – that tuft of slender hay-colored fibers resembling cornsilk (but very, very, choke-y if they get into your mouth!!! Time to be careful, once again).
- Pull (or scrape) off all of the choke fibers to expose the artichoke bottom – it resembles the center of a daisy.
- The artichoke bottom is dense, creamy, velvety and – hooray – COMPLETELY edible. It can be cut into quarters and then dipped – aw, go ahead, let’s “bathe” not just “dip” these pieces! They are the true finale – the “big finish” -- of the artichoke experience!

Dipping Sauces to Try (just a few suggestions):

- Butter: the classic dip for artichokes
- Hollandaise sauce: you know the one, that rich egg-yolk-and-butter cooked sauce
- Plain oil-and-vinegar salad dressing
- Japanese-style sauce of soy sauce, lemon juice, garlic, ginger, dark sesame oil
- Plain yogurt flavored with garlic, lemon juice and prepared mustard
- Roasted red peppers pureed with a little extra-virgin olive oil
- Tomato sauce, fresh or cooked
- Roasted garlic cloves pureed with a little extra-virgin olive oil and lemon juice

Because the medium-sized, dippable, artichokes are such an event unto themselves, they are often served as a separate, first course. That way, they get the attention they deserve and their unique, subtle flavor is not camouflaged with other foods. And, undoubtedly, they alone are enough to keep even we two-fisted eaters completely engaged!

While it is slightly unfortunate that I could not draw instructional pictures – of course, artichokes aren’t really all that difficult after all, now are they – I still wish that I could grab hold of some trusty paints and sketch out a lovely artichoke still-life. With their dramatically sculpted shapes, they are individual masterpieces of design and structure -- truly artful subjects for a painting indeed.

Maybe if I painted quickly enough and the artichokes were still fresh when the painting was complete, I could then cook them up and eat them. Enjoy their wonderful flavors -- yet still see them in their integral beauty in the painting. Rather like “having your artichoke and eating it too,” I suppose!

Bon appetit!


Friday, September 16, 2005


Casserole Trinity Posted by Picasa

Casserole Construction

You really have to admit it – cooks and food-people are a very religious group! Don’t think so? Aren’t convinced? Well, let’s see, there must be some evidence (even if it IS anecdotal!) out there somewhere …

First of all, there’s the French. Now we all KNOW how into food THEY are! And how do they refer to their three national food products of pride (bread, cheese, wine)? The holy trinity of French gastronomy.

And then, there’s the soup scene. When cooks get out the stockpot and chef’s knife, what do they reach for to get things started and to set those juices flowing? Onions, celery and carrots. And what do they call them? The holy trinity of soup stock.

So, as the weather took a turn for the cool this week – bringing to mind thoughts of Fall and fireplaces and sweaters – what did the Ingredient Sleuth think of? Casseroles (that would be “baked dish” in Minnesotan -- at least that's what the humorous book How to Talk Minnesotan says!), hot and steamy from the oven.

And, being every bit as religious as the French and the soup chefs, what do "cookers of casseroles" select from the larder? Protein, grains and vegetables -- the holy trinity of casserole construction! With those dependable (P-G-V) items on hand, a good casserole is always just around the corner!

After last week’s musings on flatbreads, the Ingredient Sleuth's casserole of choice turned out to be a little number that the I dreamt up a few years ago. In this case, the beans and cheese are the protein, the corn (cream style and tortillas) is the grain and the tomatoes, zucchini, onions and peppers are the vegetable. Always easy and always tasty, this layered "baked dish" sends warm aromas of comfort wafting through the house in no time.

INGREDIENT SLEUTH’S TORTILLA CASSEROLE

Sauce:
½ large onion, chopped
1 tablespoon olive oil
1 medium zucchini, halved lengthwise, finely sliced
3 cloves garlic, minced
½ cup red or green bell pepper, slivered into1-inch lengths
15-ounce can red beans, drained
15-ounce can diced tomatoes, with juices
15-ounce can cream-style corn
½ teaspoon dried, red chile pepper flakes
½ to 1 teaspoon paprika or chili powder
Salt and pepper to taste

Structure:
4 corn tortillas (8-inch size)
1 cup shredded cheddar or pepper jack cheese


1. Saute the onions in the oil over medium heat, until golden, about 5 minutes.
2. Add the remainder of the “sauce” ingredients in the order listed above.
3. Simmer 5 to 10 minutes, to blend flavors and achieve thickness of lasagna sauce. Taste and adjust seasonings.
4. Layer the sauce in an oiled, 8-inch-round casserole dish with the tortillas and cheese, starting and ending with sauce. Cover with ovenproof lid or aluminum foil.
5. Bake at 350 degrees for 45 to 50 minutes.
6. Garnish with your favorite toppings: parsley, onions, chopped tomatoes, sour cream, avocado, if desired.

(4 servings)

Have you noticed how TV chefs are using the "build the dish" terminology more and more? Maybe it's about time to do some serious casserole construction at YOUR house as well! We all need some comfort food every now and then. Time to get some culinary religion and reach for that trinity -- and casserole dish -- once again!

Bon appetit!

Friday, August 26, 2005


Heirloom Tomatoes from Laguna Hills Farmers' Market Posted by Picasa

Tomatoes of Heritage

The community garden, nestled at the edge of the city, was a veritable beehive of activity. Grandparents talked enthusiastically with each other, proudly displaying visiting grandchildren and garden produce to each other.

One particularly precocious young lad of about ten years of age attentively followed his grandmother’s conversation with her adjacent garden-plot renter. “Oh, we can’t wait each day to see if any of our tomatoes are ready to be picked,” said Grandma. Stooping over to pluck a striped, green tomato from the fuzzy vine that left its pungent aroma on her well-worn gardening gloves, she added, “It’s always such a pleasure to find well-ripened ones.”


The adjacent gardener furrowed his brows. Perhaps Grandma had developed a recent case of color-blindness. Or maybe she had just been out in the sun a little too long. Or possibly she was making a batch of fried-green tomatoes? How could he stop her from picking those still-green tomatoes from their vine-y support system?

The attentive ten-year-old boy noticed the other gardener’s concern. “Oh, it’s alright Mr. Jones,” he whispered brightly, “these are grandma’s green zebras and they’re a heritage!” At that comment, of course, the concerned gardener’s eyebrows shot up to the very top of his constantly-receding hairline! Green zebras? Heritage?


But Grandma and grandson were in completely-correct gardening form. They had researched their topic and were ready, able and competent. In fact, they had spent many happy afternoons together, during the preceding winter as powder-dry snow swirled around the windows, poring over seed catalogues and Internet sites, in search of a half-dozen heirloom tomato varieties for their garden plot.

This year, they were going to get back to basics, focus on the tried-and-true, celebrate some heritage of days gone by. The search was difficult, though. Lack of sources, lack of variety was not the problem – there were so MANY interesting options that it was just so very difficult to choose! They wanted to order all of them!

But, choose they (finally) did and as summer approached, seeds were planted in indoor trays, then seedlings were set out into the garden when the weather was favorable. And, ever since that late-May day, Grandma and grandson had shared a special outdoor project that produced lifetime memories, in addition to glorious tomatoes, that were especially their own -- their memories of heritage!

“The Heirloom Tomato Project,” as their effort was named by the 10-year old, grew out of a visit that they had made to the local farmers’ market the previous summer. As they strolled the wide aisles, they had been captivated by one stall in particular. For, arrayed on the stall’s table, were tomatoes of every description except the usual! In fact, there were none of the usual, fire-red, uniform globes of supermarket fame.

Rather, this display of tomatoes had been slightly reminiscent of a “seconds sale” at the local pottery factory. Rather than smooth, thick skins – the kind that allows supermarket tomatoes to be picked before ripe, then travel thousands of miles from growers, and then sit patiently on the shelf for days, all the while LOOKING lovely but having never developed a full, ripe flavor – these oddball varieties had unusual shapes and fragile skins. They came in all sizes. And there were colors from pink to purple to yellow to green and gold – oh yes, and some reds as well!

The farmer at the market stall had been friendly and smiled knowingly at the grandmother and grandson. He could see the spark of interest in their eyes (those large, smiling brown eyes that so resembled each other’s) and knew that they wanted to know more. Their rapt attention, as he explained the basics of heirloom tomatoes, was very gratifying to him.

The oldest tomato variety in America has been grown consecutively for 600 years. It happens to be a small, pear-shaped tomato that is red in color. To qualify as an officially-designated “heirloom” variety, though, a tomato need be grown unchanged (maintaining the identical size, flavor, texture and color characteristics) for “only” fifty years – in many cases, by the same family. And that of course, is where the “heritage” comes in! Passed from generation to generation, the heirloom tomatoes have been kept in their original form and format -- rather than hybridized or cross-bred again and again to produce those supermarket globes.

As a result, the true flavors, which different significantly from each other, are maintained in each heirloom variety. Some are quite pungent and tart, high in acid content. Others are milder, some almost fruitlike (yes, yes, the Ingredient Sleuth is aware that all tomatoes ARE fruits, not vegetables) in their sweet flavors. Some are particularly juicy, others firm.

“Imperfections” such as splits (called “cat faces”), bruises or belly-button-like protrusions are common and often cause people to shy away from the heirlooms. Ironically, those very same shape irregularities are an indicator of a likely heirloom variety – an important piece of ingredient-sleuthing information. The farmer suggested that, when looking for a flavorful tomato experience, one think “lobes” rather than “globes.” The extra pockets and indentations in heirloom tomatoes simply mean that THESE varieties are in their original format – not in the hybridized format. (Can’t you just hear the “heirlooms”, upon observing the made-over “supermarkets” saying playfully, “Hmmm, it looks as if THEY had some work done!”).

With names like Purple Cherokee, Pink Caspian, Aunt Ruby’s German Green, Mister Stripey, Pineapple, Green Zebra, Abe Lincoln, Super Sioux, Goose Creek, Persimmon – even one variety named Julia Child – heirloom tomatoes seem to have personalities of their own, even before tasted. One variety, called Northampton Italian, is elongated in shape and is often mistaken for a pepper. (To read more about varieties and sources for heirloom seeds and free seed catalogues, see http://www.rareseeds.com/. You can even subscribe to “The Heirloom Gardener” magazine or to a free heirloom e-mail newsletter.)

Because of their thinner skins and resultant shorter shelf life, heirloom tomatoes are meant to be enjoyed soon after picking. And therein lies the explanation for the scarcity of them in supermarkets. Heirlooms are not happy when transported thousand of miles to a supermarket. Rather, local sourcing, close to the location of the tomatoes’ growth, is ideal and brings farmers’ markets, farm stands and backyard gardens to the forefront of the heirloom tomato scene.

So, to find good heirloom tomatoes, it seems that one has to look for them in the fresh air! Many farmers’ markets and farm stands allow free tastes, to help facilitate awareness and spread the heirloom gospel. There the little beauties will be, in all their colorful glory -- and never, never will they have been subjected to (gasp!) that flavor-killing refrigerator!

Heirloom tomato festivals are held from coast to coast in the United States – and are especially popular in areas in which truck gardening and small farms are common. California, Missouri and New Jersey are particular heirloom tomato hot spots! The Hollywood (CA) Farmers’ Market, in fact, will hold its annual “Peak of Summer Tomato Festival” this Sunday (morning), August 28th. And then, on September 11th, the annual Tomato Festival will be held in Carmel, California and will feature 300 tomato varieties for tasting. A quick Internet search for “heirloom tomatoes” and “festival” will undoubtedly produce festival opportunities in other locales.

Grandma and grandson couldn’t have been happier with their newfound knowledge or with their peak-of-season harvest. Their heirloom planting project was a success and their shared interest was a delight to both. Because heirloom seeds retain their complete character profile, the gardening duo happily harvested seeds to dry for next year’s planting -- feeling even more thrifty than usual! Of course, they already have plans to place another order for some additional varieties as well!

Whether planning your own next-year’s garden, taste sampling at an outdoor stall or just jumping in to buy a few, ripe heirloom tomatoes of your own to enjoy with dinner, maybe there is an “Heirloom Tomato Project” in your future too!

Friday, August 19, 2005

The Soup of Seville -- via Sheboygan!

The Generalife Gardens at the Alhambra Palace near Granada, Spain are a splendid sight. Verdant, lush vegetation covers hillsides and terraced, level areas. In the geometric, structured gardens, archways are covered with roses of many colors. Their exotic scents blend and waft through the air.

Birds flutter overhead, attracted to the beauty, twittering to each other in a flurry of activity. Water, including river and streams and fountains, babbles everywhere. Tourists from around the world smile and murmur in delight.


The Moorish emirs of Granada wanted to recreate the Garden of Eden at this location. They diverted a river to provide water and set in place a garden of visual, olfactory and culinary delights. Generations of visitors have been appreciative of their efforts.

In this corner of Spain, today’s Andalusians continue to recreate the Garden of Eden – in a soup bowl! Gazpacho is Andalusia’s best-known dish and probably originated in a different format (no tomatoes or peppers, which came to Spain after Columbus “sailed the ocean blue” to the “New World”) during the time when Spain was part of the Islamic world in the Middle Ages.

Today, the most-familiar versions of gazpacho are probably those from Seville and Cordoba. However, most cities and towns throughout southern Spain’s Andalusian region have their own, slightly-different versions. The common, distinctive ingredient among all the versions was, and is, bread. Originally, like so many wonderful dishes, gazpacho was peasant food. It was eaten by workers in the fields: vineyards, olive plantations, citrus groves, wheat fields and cork (tree) farms. It was field-travel friendly – and still is today!

Gazpacho was popularized outside of the Andalusian region in the 19th century and finally worked its way to popularity in northern Spain around 1930. It became quite fashionable there and continued its wanderings worldwide as the 20th century progressed. How many of us, after visiting Andalusia, return home with visions of hillsides in our hearts and yearnings for gazpacho in our taste buds? The Ingredient Sleuth, for one.

The following “gazpacho interlude” comes from the wonderful, new book BIRO: EUROPEAN-INSPIRED CUISINE by Marcel Biro and Shannon Kring Biro (Gibbs Smith, Publisher, 2005):

"Marcel Biró’s Gazpacho

Originally a laborers’ dish, Gazpacho was the standard fare of Andalusian muleteers who carried it in earthen pots on their travels. Today the soup contains vegetables and differs from city to city within Andalusia—each version claiming to be the original. Arguably, the first recipe came from Córdoba and consisted of bread, garlic, olive oil, and water. Today Córdoban Gazpacho is thickened with cream and cornmeal. In Jerez it is garnished with raw onion rings, and in Malaga it is made with veal bouillon and sometimes garnished with grapes and almonds. In Cadiz Gazpacho is served hot in the winter, and in Segovia it is flavored with cumin, basil, and aïoli.
This recipe is inspired by that of Seville, a city that, of course, also lays claim as home of Gazpacho.

Serves 6

1 pound vine ripe tomatoes, peeled and chopped
½ cucumber, peeled and chopped
1 green bell pepper, seeded and chopped
1 red bell pepper, seeded and chopped
1 small yellow onion, chopped
1 garlic clove, chopped
1 cup breadcrumbs
2 tablespoons extra virgin olive oil
2 tablespoons red wine vinegar
2 cups tomato juice
½ teaspoon dried leaf marjoram
Sea salt
Freshly ground black pepper

1. Purée all ingredients in a food processor or blender. You may need to process it in two batches. Blend until the soup is the consistency you favor. Some people prefer chunks, others a completely smooth soup. I prefer my Gazpacho somewhere in between: with some bite and the consistency of heavy cream.
2. Pour the soup into a large stainless bowl, cover, and refrigerate for at least 2 hours. When the soup is well chilled, adjust seasoning with salt and pepper.

Presentation
Gazpacho is traditionally served with a selection of garnishes including chopped hard-boiled eggs, chopped cucumber, chopped onion, chopped green and black olives, and diced green bell pepper. This soup is therefore best served family style, and I prefer to use earthenware dishes, as the recipe was originally prepared in clay bowls.

Quick Tip: Other uses for Gazpacho
I’ve used Gazpacho leftovers as a pizza sauce, a warm pasta sauce, a sauce for a goat cheese tarte flambée, a cold and warm garnish, and even as a cocktail sauce by adding a bit of horseradish. Be inventive with this versatile soup and know that the longer you keep it, the more complex and intense the flavor will become."

*Copyright Note*: Marcel and Shannon Biro specifically authorized this excerpt and recipe reprint, by the Ingredient Sleuth, in this posting.

A huge part of the pleasure of any travel experience is the representative food of the visited location. This book steps right up and puts the know-how to recreate those dishes into the reader’s hands.

For me, this gazpacho is filled with my memories of Andalusia. As I taste the soup's bright, fresh and snappy flavor, I am transported to Alhambran gardens and striking hillsides and flamenco performances with bright, fresh and snappy music – sometimes I even jump up and do a little fancy footwork of my own in celebration!

The book’s recipes are representative of the favorite regions in which Marcel Biro has worked: southern Germany, Alsace, Tuscany and Andalusia. The recipes are meant to take you to – or back to – those wonderful destinations as you cook up the wonderful dishes at home.

As one of the youngest chefs in European history to achieve the title Master Chef de Cuisine, he is acclaimed for winning several coveted European awards, for his accomplishments in Michelin-starred restaurants, and for his dedication to demystifying classic cuisine.

As a European Certified Chef Instructor, Biro has fed those with a hunger for professional culinary knowledge throughout France, Germany, Switzerland, Austria, Spain, Hungary, Italy and the United States. He has worked at internationally acclaimed restaurants and was personal chef to German Chancellor Helmut Kohl.

Biro is host of the new national PBS (Public Broadcasting System) reality cooking series “The Kitchens of Biro.” He is also chef/owner of Biro Restaurant and Wine Bar and of O – a Biro Restaurant, both in Sheboygan, Wisconsin. In addition, the Biros (Marcel and Shannon) offer a bonanza of culinary events and activities (see http://www.kitchensofbiro.com/) for culinary enthusiasts. Trips to Europe, cooking classes, entrepreneurial consultation and more are available.

Mr. Biro came to appreciate the value – the precious nature – of good ingredients at a young age, in East Germany. He has based his career on bringing wonderful, healthful ingredients to new heights in dishes that will be available to all. What really warms the heart of the Ingredient Sleuth is the following sentence from the book’s introduction (reprinted with permission) as Biro says:

“Whether you prepare the recipes as outlined or put your own unique spin on them – which I encourage – I hope that you take a moment to really touch the ingredients, to inhale their wondrous scent, and to appreciate their beauty. In my life and career, I have come to fully comprehend the value of freedom and the great privilege I have to work with food. For me, it is an honor never to be taken for granted.”

Friday, August 05, 2005

Cool as a Cucumber, Even in August!


Hothouse Cucumber


"I say, old chap, have you had your cucumber sandwiches today?" A quick glance at the clock indicated that, indeed, it was almost past the normal tea time.

"Rather, on such a warm day, it would be exceedingly lovely to pop over to the pub, don't you agree?" was the reply.

Hmmm, tea time or pub time. Cucumber sandwiches with tea OR chips with a pint of ale. How to choose -- on a scorching summer day in England's countryside.

In days of old, this decision dilemma may have prompted a lengthy discussion of the merits of each approach, followed by the ultimate selection of one or the other alternative. It seems reasonable to conclude that cucumber sandwiches' popularity may have suffered in the process! In today's world of fusion cooking (and eating), cucumbers have become mainstream. They MAY even be found, in their cucumber-sandwich format, in the very same establishment that offers pints of ale.

Hothouse cucumbers, in particular, have hit the culinary circuit in a big way. Also called European or English cucumbers, they have crisp, juicy flesh and thin, edible skin. They have only a few (or no) tiny seeds and are typically 12 to 24 inches in length. Some people report that hothouse cucumbers are easier to digest (as a result of the lack of seeds) than regular cucumbers.

Grown in a controlled, greenhouse environment, the fruit of the hothouse cucumber develops without need for pollination of the vine's blossoms. This is the reason that few seeds form within the fruit. Of course, in no time at all, this methodology could be quite limiting to the future existence of the variety! Seeds are still needed to plant new vines!

In order to produce seeds for future hothouse cucumbers, growers partition a selected group of vines that will be raised specifically for seed production. Flowers on these vines ARE pollinated. While the resulting cucumbers will not be of the same high flavor and crispness as the un-pollinated fruits, the bounty of seeds they yield will produce vines capable of producing the very same high-quality, unseeded cucumbers when grown in greenhouse conditions.

At harvest, hothouse cucumbers are packaged immediately in transparent, plastic film in order to retain their moisture, crispness and flavor. This method, rather than the application of wax approach taken with most cucumbers, allows the skin to be used -- no peeling required -- and significantly extends the usable, tasty shelf life of the cucumber.

Preparation options for hothouse cucumbers are also extensive. They are excellent for use raw, in salads, sandwiches, salsas, drinks, sushi and hors d'oeuvres -- and as refreshing dippables -- because of their crispness and eye-appeal (thanks to that usable border of thin, dark-green skin).

Because of their firm texture and subtle flavor, hothouse cucumbers also are well-suited to cooking and are often used in a similar manner to zucchini. Their delicate flavor when cooked pairs especially well with fish and poultry. Braising, sauteing and steaming are common preparation methods. They may also be halved and hollowed out to form"boats" and filled with meat, vegetables or breadcrumb stuffing before baking in a bit of stock or broth. The mild flavor of cooked cucumbers blends well with a post-cooking addition of herbs such as dill, mint, tarragon or basil.

As August begins, the Ingredient Sleuth is happy to provide a recipe for a spectacular chilled cucumber soup. It comes from the equally-spectacular new book, COOKING AT HOME ON RUE TATIN, Harper Collins Publishers, June 2005, by Susan Herrmann Loomis.

This great new cookbook carries on Ms. Loomis' reputation for delicious cooking that manages to be down-to-earth sensible at the same time as elegant. How DOES she DO that? Many people make the trip to her home-based cooking classes in the town of Louviers, France, on Rue Tatin (Tatin Street), to find the answer to that very question. Others are simply thankful that she puts pen to paper, hands to computer keyboard, to share her culinary thinking with all of us who read her books from afar.

In COOKING AT HOME ON RUE TATIN, Ms. Loomis provides much more than ingredients with associated assembly instructions. Recipes are paired with brief stories that relate to people, places and events from her own town and regions throughout France. As we read, we glimpse the interactions with merchants, growers, farmers, fishermen -- and most rewardingly, friends in all these categories -- that have inspired each dish and contributed to its enjoyment. We peek into the interrelationships that produce great food and good friends -- enhancing the entire food experience.

For more info about the book, Ms. Loomis' cooking courses and her other books, see http://www.onruetatin.com/.

THE CUCUMBER SOUP OF SUMMER

6 servings

· 2 long firm European or Asian cucumbers (about 2-1/4 pounds; 1kg 120g total), chilled, peeled, halved lengthwise, any seeds removed, and coarsely chopped
· 4 small fresh onions, or 6 scallions, white part only
· 1 cup (250 ml) heavy cream or half-and-half, preferably not ultrapasteurized
· Fine sea salt and freshly ground black pepper
· ¼ cup firmly packed flat-leaf parsley leaves
· 6 fresh mint leaves

1. Place the cucumber in food processor fit with a steel blade, and process.
2. Add the onion and process until the mixture is a frothy puree. Add the cream and process to blend. Transfer to a bowl and season to taste with salt and pepper.
3. Mince the parsley and mint together and stir them into the soup. Cover the soup and refrigerate for at least 2 hours before serving, and up to overnight (8 hours).

*Copyright Note*: Susan Herrmann Loomis specifically authorized this recipe reprint, by the Ingredient Sleuth, in this posting.

In a word, this soup is COOL! This is true in both the literal sense of the word and in today's lighthearted vernacular (as in "that's way cool soup, dude!"). Each and every ingredient has a cool and refreshing flavor component; the exquisite combination of the ingredients is brightly-refreshing and smooth, all at the same time.

Ms. Loomis says that the soup was inspired by a friend who readily admits that she doesn't like to cook -- but LOVES to eat! The recipe is simple, delicious and won't work up any extra heat in the preparation. Now THAT'S COOL!

Bon appetit!

Friday, July 29, 2005

Chick-Pea Flights of Fancy


The tiny plane’s even-tinier engines begin to purr. All on board the private jet are buckled into their seats. Even though they are on a plane, the passengers are truly departing on a “busman’s holiday.” Rather than leaving for a leisurely stay at sun-washed beaches or mountain cabins, the vacationing chefs are departing on a whirlwind, worldwide market tour – doing exactly what they do every other day, only in faraway places.

Each chef has a tiny suitcase, tucked under the seat in front of him (or her, of course!). In each suitcase is one costume-change – or should we say, one disguise! On this mission, each chef has a critical assignment and blending in with the locals will be a crucial element of success. The energy of anticipation is in the air.

As the plane touches down on a makeshift runway, the anticipation turns into a babble of excitement. Well-rounded bodies strain to free themselves from the cramped quarters. At this stop, Pois Chiche (an alias for today’s mission) is responsible. He has donned his tailored slacks and jacket, slipped into his polished brown loafers and completed his disguise with a jaunty, yet subtle, beret. Before leaving the plane, he winks at his friends. Pois Chiche knows exactly where he is headed and, in no time, climbs back into the plane, winks again, and hands his bounty to the mission commander. “There they are,” he says, “some of France’s finest walnuts from the Perigord!”

Even before the congratulatory applause has ended, the plane engines purr again, all clamor for their seats and they are off! At cruising altitude, the chefs realize that the Alps look particularly majestic today. Confident Cece (that’s right – also an alias!) has no time for awestruck gazing, however. She has barely enough time to strap on her airy sandals and wiggle into her designer dress and bright, yellow sunhat before the plane lands once again, this time in Tuscany.

As Cece steps from the cockpit, the capable smile on her face suggests that all will be well with this mission. Indeed, in a flash, she has struck up a conversation with a prize-winning Italian chef who is also shopping for olive oil. After both of them taste a half-dozen of the best oils, swishing and swirling the samples in their mouths like fine wine, Cece says her goodbyes and returns to her chefly comrades. “Here it is,” she beams, “Italy’s brightest sunshine!” She hands the bottle of shimmering, gold-green olive oil to the commander and breathes a soft sigh of relief. Her portion of the mission has been an overwhelming success. First-cold-pressed, extra-virgin olive oil. The absolute best!

As the tiny plane heads west, the orange-red sky, with its bright orange sun, strikes a prophetic note for gregarious Garbanzo. His mission (given that he has chosen to accept it) is oranges – the sweeter, the better! The sunny fields of Mexico spread out before the tiny plane as it rolls to a stop. Behind the plane, the produce market near the dance ballroom is crowded with strollers. Garbanzo’s black-fringed hat, form-fitting suit and hard-heeled boots are the perfect attire for the assignment – one dazzling senorita even asks him to be her partner for the evening’s opening dance!

Tempting though it is to give up his cooking for the dancing scene, Garbanzo keeps focus and quickly identifies the display of sweet-and-juicy oranges. He selects the prescribed dozen for his assignment – then adds four more. As he steps into the plane, he tosses an orange to each of his compatriots and soon, four fine sprays of “orange mist” are dappling cockpit windows as discarded orange peels drop to the floor.

Coolheaded Chick-Pea (aliases no longer required!) barely has time to pull out a wet-wipe and clean her orange-juiced hands before it is time to jump into her California jog outfit – or should that be called “active wear” now? Flip-flops slapping on the plane's metal stairway, she hits the tarmac at a run, pulls the sunglasses down from the top of her head and is browsing at the California market place faster than you can say Arnold Schwarzenegger!

Soon, Chick-Pea’s mission, like those of her team members, has been a complete success. Round and plump raisins – a wicker basket full of them – complete the requirements for the full mission. As the Mission Commander, Chick-Pea breathes a sigh of relief that encompasses, and surpasses, all the others. She is confident that her client, the Ingredient Sleuth, will be pleased and that people from near and far will acknowledge the highly-versatile chick-pea (alias garbanzo, cece and pois chiche!) as the perfect blend with many great ingredients from the rest of the world.

Not just because the chick-pea is one of nature’s most-truly perfect foods – which it is. Not just because the chick-pea can be used in salads, soups, dips, pastas and stews – which it can. Not just because the little chick-pea chefs in the story are so silly – which they are.

But because the nut-like flavor and the slightly-firm texture of chick-peas are so tastefully-accommodating to other great ingredients that they simply DESERVE to be paired with delicious items from the whole, wide world!

Coincidentally, the little recipe that follows just happens to use the wonderful items that the Chick-Pea Chefs collected on their trip! (Isn’t it amazing how that happened?) Of course, apart from flights of fancy, the Ingredient Sleuth actually collected all of the ingredients at her local grocery -- except for the juicy orange, which came straight from the tree in her back yard!

Ingredient Sleuth’s Juicy Garbanzos

15-oz. can of chick-peas (garbanzos), rinsed and drained
½ cup walnut pieces (toasted is extra good)
½ cup raisins
½ cup orange juice
Zest of one orange, shredded (optional)
1 tablespoon extra-virgin olive oil

Mix together and refrigerate to chill, allowing the raisins to soften and the flavors to blend. Use as a salad, as a snack for the afternoon “munchies” or as a dessert or breakfast treat (yes – really!). If you call it “juicy garbanzos” rather than “chick-pea salad” when you serve it, the kids may just dive in for the duration! And the Garbanzo Chefs will be ever so proud that their mission has been triumphant!

Friday, July 15, 2005


Red-and-White Radishes in Rouen, France Posted by Picasa

Radishes -- For Looking and For Eating

On December 23rd each year, as the sun settles into the western sky and darkness falls, a tradition unfolds in Oaxaca, Mexico. In a single-file line, viewers pass slowly in front of lighted displays, set up on wooden tables in the city’s central plaza. Several days of preparation have been consumed in the production of the works of art that rest brightly on the tables.

To be sure, nativity scenes will be featured, animals and people and trees and stable included in the display. Saints with vivid expressions, cathedrals with intricate windows and maybe even a few dancers with flowing skirts and sword-wielding conquistadors will join the show. From time to time, even the Mexican revolutionary hero Emiliano Zapata appears!

Contestants smile broadly as viewers marvel at the intricate and colorful figures on display. Hopes run high, at each and every display, that its carefully-sculpted carvings will be a prizewinner. This festival, begun in 1897, is called Noche de los Rabanos – Night of the Radishes!


That’s right, all of the delicate, graceful figures are carved from radishes! Makes one wonder if that’s where the idea of the Pasadena Rose Parade sprouted – tables covered with radish figures inspiring floats covered with flower figures!

It also makes me wonder how I could EVER have felt so proud of myself after finally discovering that my radish roses would actually LOOK like roses, with softly curling petals, if I soaked them in ice water for an hour after making the criss-cross cuts. Well, to each level of artist there is an appropriate level of challenge!

As for the radish itself, it must feel – at least in Oaxaca – as if it is receiving the attention it deserves. Not just a garnish at the edge of a plate, an afterthought haphazardly plopped onto a bed of greens, a red item to complete the pinwheel of raw veggies surrounding the dip in the center of the platter, but rather, the star of the show!

Radish creativity has been increasing, culinarily speaking, in the rest of the world as well. The low salt and calorie levels, beneficial Vitamin C and digestion-enhancing benefits of this rooty member of the cruciferous family (with its above-ground broccoli and cabbage cousins), is turning up in all kinds of new settings and in all kinds of shapes.

The ultra-large (multi-pound) radishes used for the Oaxacan carvings are local to that area, for example. They grow into twisted and distorted shapes because of the rocky nature of the soil and range in color from white to pink to bright magenta.

In the United States alone, there are eighty-two different radish cultivars available. At farm stands and farmer’s markets, at least, we occasionally are able to see a few of those; home gardeners who dabble in radish cultivation see many more. It is often said that radishes are the perfect garden crop for children. Radishes sprout within days of seed planting and produce edible roots in thirty days. The perfect gardening project for children – or anyone else with a short-fused attention span!

Even the commonplace Red Globe radish of supermarket fame has taken a turn for the exotic, at least as far as preparation methods are concerned. Baking, sautéing, stir frying, steaming and even microwaving have hit the radish cooking circuit.

Whether radishes reach the kitchen from the backyard garden or from the market, they will keep fresh longer if the tops are removed before storing them in the refrigerator. (Incidentally, the tops, if fresh and green, are completely edible and can be cooked like other greens or used in soups.) The radishes will wait patiently in the fridge for a week, possibly even two, while the creative radish chef whips up a variety of dishes.

So, let’s get started! The Ingredient Sleuth recommends a few personal favorites for your tasting pleasure:

ROASTED RADISHES: Halve the radishes, drizzle with olive oil, sprinkle with some cinnamon, salt, pepper, garlic powder and herbs of your choosing, roast in a hot (375 to 425 degrees) oven for 15 to 25 minutes, depending on the size of the radishes. A great accompaniment to roasted or grilled meats.

SAUTEED RADISHES: Slice the radishes and sauté in butter for a few minutes, remove from pan, sauté some chopped spinach or arugula or romaine for a few minutes, return the radishes to the pan, season with salt and pepper. Excellent with chicken or fish.

RADISH SALSA: Smash a clove of garlic (with some finely shopped chili pepper, to taste), add some lemon or lime juice, a few chopped tomatoes, a handful of roughly-chopped radishes, half of a sliced red onion, a tablespoon of olive oil and a handful of chopped mint leaves. Refreshingly tasty with corn or bean chips and as a topping for chicken.

RADISH VEGGIE SALAD: Combine thin slices of radish and red onion with chopped tomato, chopped parsley and avocado slices (with a touch of chilies or pepper flakes, if you like things peppery). The tang of the radish with the smoothness of the avocado is lovely in this side dish salad.

RADISH FRUIT SALAD: On a platter or individual serving plates, arrange watermelon cubes, then roughly crumble feta cheese on top, add thinly-sliced radishes, top with freshly-ground black pepper and some chopped mint. Drizzle some citrus juice (lime or orange) and olive oil over everything. For the dog days of summer, a cool explosion of fresh, salty, spicy, peppery and sweet flavors.

Whether it is Christmas time in Oaxaca, Mexico, or the dog days of summer thousands of miles to the north, the radish aims to please! It is sure to deliver a spicy, pick-me-up tang to your meal – and then to assist in digesting the rest of the meal, in gratitude for being invited to the party! It’s not just for the edge of the plate any longer!

Friday, June 10, 2005


Zucchini Blossoms Posted by Hello

Squash Blossom Bonanza!

“I’m so disappointed with my zucchini crop! I told all my friends that I would be supplying lots of squash to them this summer but so many of the blossoms never form any squash. The big, yellow flowers are beautiful and healthy but then they just close up, wilt and that’s it. I wonder if there aren’t enough bees to pollinate them or something ………”

The Ingredient Sleuth made this statement not so very long ago. Little did I know what I was missing. Little did I know about summer squash! I shouldn’t have been disappointed with my squash but they would certainly have been justified in being disappointed with me! How wrong I was about them!

In fact, the blossoms of summer squash (zucchini, crook necked, Mexican, etc.) are edible. Being of the thrifty persuasion, though, I was still skeptical in light of that revelation. It seemed so wasteful to indulge in the blossoms, no matter how delicious and delicate they may have been, thereby forestalling the production of the squash themselves.

Wrong again! That was then – this is NOW! Bring on those blossoms and let’s cook them up!

In fact, blossoms are either male or female. Male blossoms will not – EVER – form squash. They have a thin stem and spiky calyx at the base of the flower, making them easy to distinguish. Female blossoms, in contrast, have a small baby squash at the base of the flower. In both cases, the bright yellow flowers form a trumpet shape, then open wide in a five-pointed star, then close again. The blossoms are at their peak for only one day. So, one has to be vigilant in order to harvest them at the height of their goodness.

Farmers' markets and farm stands are prime territory for squash blossoms. Generally, they are sold in bunches of a dozen or so. And, they are a true sign of summer, continuously available during the summer months. (Home growers need to be aware that the production of blossoms will be limited if the mature squash themselves are not harvested regularly from their vines – if the plant begins to “think” that its production cycle is ending, the flowers will not continue to form. So, giant-squash producers will produce a limited number of blossoms. Life inevitably comes with its choices!)

The delicate, sweet-and-fresh flavor of the blossoms is a delight! Whether raw or cooked, the blossoms are a tasty and visually-appealing ingredient. Plus, they are very low in calories and are a good source of beta carotene, vitamin C and potassium. It makes me shake my head to think of how many (male) blossoms I allowed to die on the vine, unused and unappreciated! Mea culpa!

The blossoms may be used raw, simply torn into attractive pieces and added to salads. Or, the little, yellow beauties may be torn into pieces and added to soups or risotto. They may be prepared in a variety of cooked formats, as well. Steaming or sautéing them lightly, then seasoning them with a quick dash of herbs and/or olive oil is a particularly-healthful option. The blossoms may also be battered and fried (either deeply or shallowly).

My favorite way to serve them is to create a mixture of one mild cheese (goat cheese, ricotta, mozzarella, etc.) with one herb (marjoram, oregano, basil, mint, parsley, etc.) as a filling. Then, after washing the blossoms (inside and out) and lightly drying them, I make a small slit (with the tip of sharp knife) in the side of each and use a tiny spoon (those from my espresso set work extremely well!) to place a small amount of the mixture inside. It is truly amazing that a very tiny amount of filling makes for a great explosion of flavor.

Next, I just space the filled blossoms on a lightly-oiled dish, leaving room in between them for the heat to circulate, drizzle them with a good extra-virgin olive oil, sprinkle on some salt and pepper, then cover them lightly with aluminum foil. They bake beautifully, becoming tender and turning slightly golden-brown, in a hot oven (400 to 425 degrees) in 15 to 20 minutes. Served immediately, the contrast of fresh-and-sweet blossom with pungent-rich, herbed cheese is incredible! Guaranteed to produce oohs and aahs from those around the table!

One additional note: if you decide to use the female blossoms, it is extremely elegant to harvest the blossom WITH the tiny squash attached, as a unit, and then to prepare them intact. If one has plenty of squash plants, this can be a delightful alternative! Someday, this miserly ingredient sleuth may even attempt it!

Virtually everyone agrees that summer squash blossoms are a delicious delicacy and, of course, that is absolutely correct. Looked at from my point-of-view, I am no longer WASTING those male blossoms – nor am I feeling frustrated that they don’t turn into squash. In fact, I have come to look at the squash plants as a squash blossom bonanza! A little knowledge, as usual, goes a long, long way!

Bon appetit!

Friday, May 13, 2005


Organic Beets from Whole Foods Market Posted by Hello

In Beet-historic Times

Prehistoric Woman, Nhor (looking up from granite work surface toward prehistoric man as he appears at the top of the distant hill): “umh … good Mhor … green in hand … we eat good”

Prehistoric Man, Mhor (approaching prehistoric woman and holding vegetation toward her with outstretched hands): “umh … look Nhor … big green … grow good … small red”

Prehistoric Woman, Nhor (twisting off any red tuberous portions of the vegetation and tossing them onto the scrap pile in the corner of the prehistoric “cave kitchen”): “umh … good … red small … green more good”

Notwithstanding the idiosyncrasies of prehistoric grammar, syntax and reasoning – Mhor and Nhor had more in common with we modern types than we may care to admit! They just didn’t fully appreciate beets – even though they cultivated them routinely. For years – possibly even centuries – beets were a foundation element of their diet, but they only ate the green parts.

Time passed. In post-prehistoric times (hmmm, would that be in “historic times”?), the red bulb of the beet was used medicinally to treat headaches and toothaches, as a tisane or tea, but not eaten. By the 16th century, though, things changed. The beet root as we know it today, round in shape and substantial, had developed. It only took another two hundred years for the rounded beets to gain any real popularity as a food!

Then, throughout Europe, beets came into their own. In Russia, the emblematic soup borscht was born. From Scandinavia to England, from France to Italy and beyond, the time was right. Relatively easy to grow and consumable from stem to stern (so to speak), the beet was an excellent source of nourishment for swelling peasant populations.

Perhaps this longstanding link to peasant cooking was what once again relegated beets to the back burner, as cuisine and education “advanced” and beets were considered to be too “common” for modern times in much of the 19th (and some of the 20th) century. Thankfully, much of today’s best – and most sought after -- cooking harkens back to its peasant foundations. And, we find ourselves in a veritable beet-historic renaissance! Beets have a new image! Everything old is not only new again, but more creative.

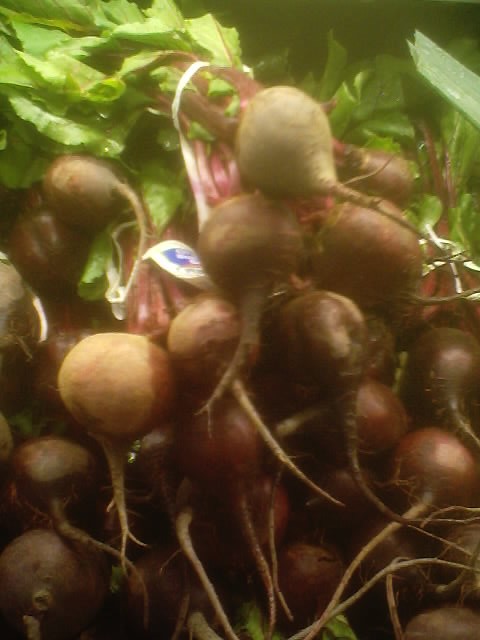
Like other leafy greens, beet greens are loaded with nutrients and are easily prepared in a variety of ways (see the Ingredient Sleuth’s March 17 essay re. leafy greens for preparation ideas). And today, the red (or yellow-gold, in the case of some new varieties) round roots have moved from the brined jar and aluminum can into the mainstream of cooking, even in the highest of haute cuisine restaurants.

Beets can be used raw, as they have been for years in Italy and France. Peeled with a vegetable peeler and shredded, they are a sweet and vibrant addition to tossed salads. Or, they can be used as one component of those great, European-style composed salads, so popular in northern Europe, that feature several shredded raw vegetables, colorfully lined up side by side on an individual serving plate and topped with a vinaigrette dressing.

Beets can be boiled, steamed, microwaved, braised or baked in much the same way as potatoes – although cooking times will be somewhat longer. Beets are done when they can be pierced easily with the point of a sharp knife. To peel – or not to peel -- the only question is WHEN (before or after cooking), because beet skins have not yet come into fashion as a food item! Scrubbing the beets, then cooking, allowing to cool slightly and then peeling is a tried-and-true method. If baking them whole, skins on, it is always a good idea to prick them several times with a fork or sharp knife, just like potatoes, before baking.

Seasonings that blend especially well with beets include mint, parsley, thyme, horseradish, dill, citrus (juice and zest), nutmeg, oregano, cinnamon, caraway, mustard and coriander. And one of my favorites is rosemary – but then again, I could probably put rosemary on chocolate pudding and enjoy it! With this array of compatible flavors, virtually everyone should be able to chose one (or more) that will “speak” to them.

If you happen to live in Europe, let’s say Italy or France or England, you probably can just pop on over to your neighborhood grocer and pick up fresh, already-cooked (or in some cases wood-oven roasted) beets. Like many root vegetables, beets really are optimized when they are roasted. The natural sugars develop (and caramelize) by means of the exposure to roasting temperatures; dry heating also locks in the nutrition.

The following recipe for oven-roasted beets comes from Ina Garten’s marvelous book BAREFOOT IN PARIS: Easy French Food You CAN Make at Home (Clarkson Potter/Publishers, 2004). This dish also exemplifies the sensible recipes that fill this delightful book – real French food, that can be prepared on a regular basis, for and by real people – all with a reasonable number of ingredients and straightforward cooking techniques.

Ms. Garten writes that she believes in keeping recipes simple and, thereby, sustainable. Having moved from a career in the White House (working on nuclear energy policy) to a career as owner of the Barefoot Contessa specialty food store in New York, she brings the sensibilities of a day-in, day-out chef to her cooking. She knows what is required, not just to fill the plates at a family dinner party, but to keep the store counters stocked with tasty food that will keep customers coming back for more. After eighteen years in the specialty food shop business, Ms. Garten has moved to the world of cookbook writing and television. Her books, "Barefoot Contessa" programs on the TV Food Network, recipes and much more are detailed at her website: www.barefootcontessa.com.


ROASTED BEETS

12 beets
3 tablespoons good olive oil
1-1/2 teaspoons fresh thyme leaves, minced
2 teaspoons kosher salt
1 teaspoon freshly ground black pepper
2 tablespoons raspberry vinegar
Juice of 1 large orange

Preheat the oven to 400 degrees.

Remove the tops and the roots of the beets and peel each one with a vegetable peeler. Cut the beets in 1-1/2-inch chunks. (Small beets can be halved, medium ones cut in quarters, and large beets cut in eighths.)

Place the cut beets on a baking sheet and toss with the olive oil, thyme leaves, salt, and pepper. Roast for 35 to 40 minutes, turning once or twice with a spatula, until the beets are tender. Remove from the oven and immediately toss with the vinegar and orange juice. Sprinkle with salt and pepper and serve warm.

(Serves 6)

*Copyright Note: Ina Garten specifically authorized this recipe reprint, by the Ingredient Sleuth, in this posting.
---------------------------------------------------------------------------

In this mouth-watering dish, the beets’ smooth richness and the thyme’s earthy liveliness are linked to the lighthearted high notes of tart raspberry vinegar and sweet orange juice. Rich, deep flavor -- tuned to brightness as sparkly as the Eiffel Tower’s hourly light shows!

It’s time to be on the lookout -- June to October is prime beet season in North America. Early in the season, baby beets with baby leaves still attached are available and can be cooked intact, green tip to red toe – a way, I think, that Mhor and Nhor would have enjoyed them, had they only known:

“Umh … good young taste … want more … red too!” Bon appetit!